Friday, July 22, 2016

Yammer is an enterprise social platform that some companies use for social networking. If you are looking to integrate Yammer to your SharePoint site it is easy! Here are two ways to embed it.

Embed using the option in Yammer.

  • Go to your Yammer group  and go to the bottom-right corner. Click on the "Embed this feed in your site" link.
  • Copy the code provided.

  • Paste the code into a Script Editor web part.You can also set the height and width of your web part. In this case I changed it to 450 x 400 px [Insert - Web Part - Media and Content - Script Editor]


  • Click insert and save the page.
  • Done!

Second Method: Using the Yammer widget Configuration

If you want more customization without the hassle of adding code by yourself you can configure the properties in the widget configuration page.

  • Go to https://www.yammer.com/widget/configure


  • Set all the parameters. You can get the group id from the URL of your group.
    For example: http://myurl/../inGroup?type=in_group&feedId=6633315&view=all
  • Once you have everything set up, copy the code and paste as the previous method.


Thursday, July 7, 2016

During the last month I learned how useful is the Content Search Web Part. I am creating a blog for multiple uses divided by categories and I want to have different views of the blog posts on different sites within the same Site Collection. To do so I am using a Content Search Web Part.

For reference, I am in the SharePoint 365 (2013) environment.

Step 1: Insert a Content Search Web Part.


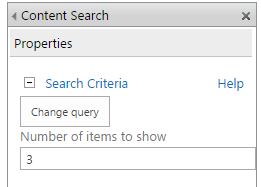
Step 2: Click on "Change Query"

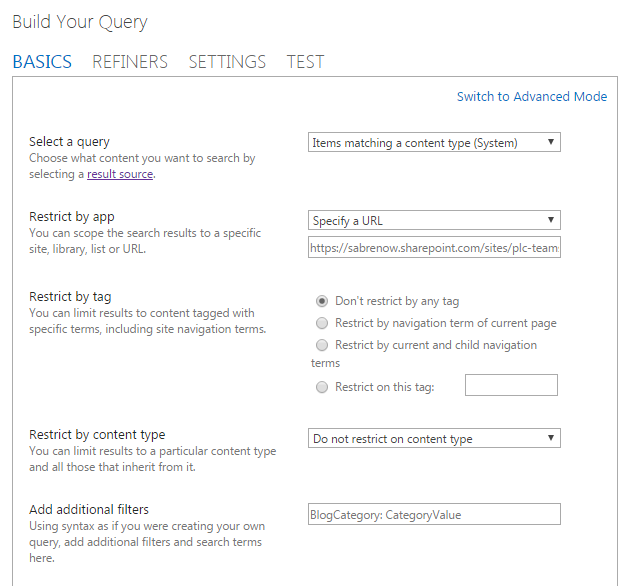
Step 3: Start Building your Query
At the Basics tab:
  • On the Select a query section click on "Items matching a content type" This will help you get only Blog Posts.
  • Add your Blog URL 


At the Refiners Tab:
  • Add ListItem_Posts t your refiners, located at the contentclass section.


Note that on the Managed Properties there is a refiner named BlogCategory, which we will use to filter by a specific category.


Go back to the Basics tab and add the BlogCategory filter.
  • On the "Add additional filters" write "BlogCategory: " and specify which category value you want to filter the results.

Step 4: Click OK and adjust how you want to display the results.


There you go!


Monday, June 24, 2013

     While working with SharePoint I came across with the chance to work with InfoPath forms. Microsoft InfoPath have a great integration with SharePoint, which makes easier to fill forms and display different fields on a SharePoint library. However I had some problem trying to display a summary of different text boxes fields in a new one to show comments on different sections of a form. Here is a summary of what I did to solve it:

1. Create a XML file with the following code:

<?xml version="1.0"?>
<linebreaks>
     <newLine>&#xA;</newLine>
</linebreaks>

** I used NotePad++ to create the file and saved it as "newLine" **

2. You need to save it somewhere on your sharepoint site and get the link of the file.


3. Create a new data connection on your infopath form.


Finally name your connection! In this case, its named "newLine"

4. Go to the text box properties.

5. At the value field, click on the "Insert Formula" button and click insert field or group:


6. On the next screen, chenge from the Main connection to the newLine connection and choose the newLine field. This will let you add a new line each time you use it.


That's it! Enjoy!

Wednesday, September 5, 2012

A way to customize your SharePoint site is by adding a Favicon. This is a generally 16x16 pixels image that usually shows the organization's logo. It is in .ico format and It helps branding your site.

In Chrome, Favicons are located in each page tab. However, in IE and other browsers, it is usually located at the left side of the URL.


If you want to add a favicon to your SharePoint 2010 site, you will need to create one. There are several sites where you can create one but I am including the one I used for this case which is http://www.favicon.cc/

1. Upload your favicon ( .ico ) to a SharePoint library.
2. Go to the Master Page. (Site Actions -> Site Settings -> Master Pages)


4. Search for the following tag:

<SharePoint:SPShortcutIcon runat="server" IconUrl="PLACE YOUR FAVICON URL HERE"/>

You will have to change the Icon URL 

5. Update and you are done!


Thursday, August 30, 2012

I already explained the easy way to add a banner to your SharePoint site. However, there's another way for adding a banner by using some CSS code and some help from SharePoint Designer.

1. Create a wide banner. If the banner is too short it will repeat. You can make it 2000 px x 110 px approximately. Rename the file as "banner.jpg".

2.  Create a text file, (.txt) name it "NewCSS.txt" and add the following code. You will replace the URL with your banner's.


.s4-title {
background:#F9F9F9 url('Banner URL') repeat-x 0px 0px;
margin:0;
min-height:121px;
overflow-x:hidden;
padding:30px 0 0 310px;
word-wrap:break-word;
}

3. After you save the text file, change the format to ".css".

4. Create a document library to save the CSS file. You can name it however you want. For this example, I will call it "CustomLibrary".

5. Upload the CSS file the the "CustomLibrary"

6. Go to the Master Page. (Site Actions -> Site Settings -> Master Pages)


7. Add the following line of code in line 36, where you will place the 

<link rel="stylesheet" href="/CustomLibrary/NewCSS.css" type="text/css" media="screen" />


8. Reload your SharePoint site and you will have your banner on.


Know us

Our Team

Contact us

Name

Email *

Message *